 I started by taking a good long look at the R75/5. Yes, to the point of staring at it up on the lift for untold amounts of time. Kind of the way Robert Duvall talked to and spent time with his stock car in the movie Days of Thunder. I always start any restoration this way, making mental and physical notes of what is going to be needed and putting together a game plan. The idea is to gain as much information about the bike and its overall condition before I disassemble it.
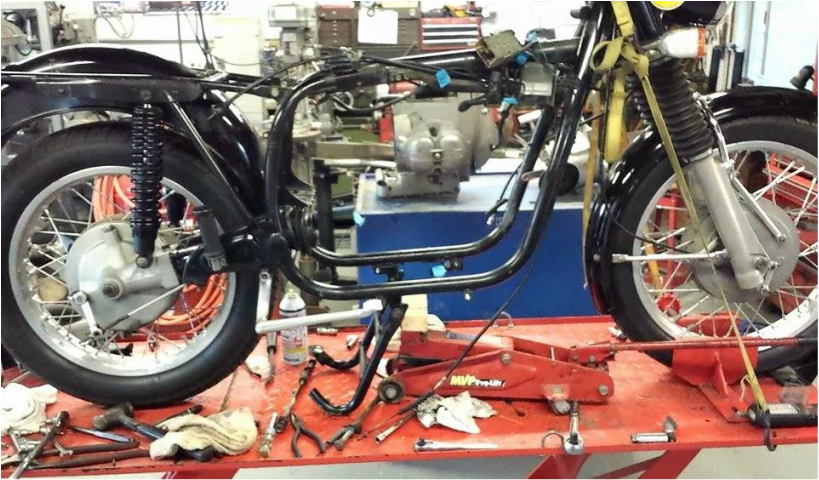
Ok, so let’s get started. I first fired her up and took her out for a quick ride, bringing her up to full operating temperature, then up to cruising speed. The ride began ok, but I quickly discovered a couple of things in need of attention. On the ride, I started with the petcocks on reserve, due to a fairly low tank. The bike began to sputter at speed, so I reached down and flipped the petcocks to the on position, temporarily solving the problem. I will have to rebuild those and clear the blockage. Continuing the ride, the bike wasn’t as lively as it should be. It definitely needs a good tune up, but also a lot of well deserved attention in several areas including the carburetors. Speaking of carburetors, the diaphragms are a likely suspect, as those have been known to cause these very kinds of symptoms. Moving on, I was able to shift through all the gears under heavy throttle, with none popping out. Shifting was of course clunky, but this one was more so then usual. The clutch is ill adjusted at best. It was very grabby even when let out slowly. Many things can cause this from a contaminated friction plate, warped clutch components from excessive heat or a crankshaft with excessive end play. Lights, horn, brake lamp, etc…all work, but the ignition switch is dodgy. If you touch the key while running, the motor and lights will cut out. Once back in the shop, I put the R75/5 back on the lift. I checked the charging system output and starter draw as well as drop voltage on suspect circuits. I like to use my Snap-On/Sun scope for this. It gives me the ability to see the wave form of the components I am testing, which really allows me to see the health of them. Kind of like when the doctor runs an E.K.G. on your heart. He can listen to it with a stethoscope, but it does not reveal enough information. Conclusion, I will have to rebuild the starter, as it had several repetitive electrical drop outs while cranking. I then checked compression (155 / 142) followed by a leak down test and discovered a leaking intake valve in the offending cylinder. Finally, I finished with a test of the oil pressure, as this is a great way to help gage the internal health of your motors bearings. During my visual assessment, I discovered a broken/missing frame tab that is used as a fender mount. Additionally, the center stand has a broken/missing metal rod that is used to push it down with your foot. Seat hinge pins are AWOL, as is the battery hold down. So I will be doing some TIG welding after I strip her down. Other items include rubber parts, boots, finned exhaust nuts, etc….This list will undoubtedly grow with time as we delve deeper into this project. To begin disassembly, we will do so modularly. What I mean is, I like to take things apart in groups. I then rebuild those parts/groups before proceeding to the next group. For instance, there is no need to disassemble the wheels, cutting the spokes, etc…until I am ready to rebuild, refinish, install bearings and lace them. It is a system that works well for me and keeps the shop tidy to boot. It also makes organizing, inventory and parts orders relatively easy. Now that we’re ready to turn wrenches, it’s time to enlist the help of my wife and son. We begin by removing the seat, tank, carburetors, battery, exhaust, necessary electrical, fluids and finally the motor and transmission. I did not want to take the cylinders and heads off during removal, because the engine will sit while I work on the chassis and make it a roller again. As a result, it was easier to take the transmission out followed by the motor. Both independently left in tack, until I am ready to machine components and conduct the rebuild. Well, that’s it for now. Next installment we’ll continue disassembly of the chassis and see about tig welding the frame. Lot’s of fun and pictures to come, so check back as the project continues and we revive this old bike as well as build some good memories!
1 Comment
JIm Knauff
12/1/2014 03:02:14 pm
Just completing a R75/5 and I admire your organization to blog about! Your comment will be posted after it is approved.
Leave a Reply. |
AuthorJames Widenmann Archives
January 2015
Categories |
- WELCOME
-
Tools
-
Parts
-
BMW CLUTCH CABLES
>
- BMW CLUTCH CABLE /5/6/7 STANDARD BARS R90/R100 S/RS
- BMW CLUTCH CABLE /5/6/7 MODELS WITH HIGH BARS R80 / R100 RT/GS
- BMW CLUTCH CABLE K75, K75 C/S, K100, K100RS,
- BMW CLUTCH CABLE 1984-ON K75 C/T/RT/LT, K100 RT/LT, K1100RT/LT
- BMW CLUTCH CABLE R850R/RT 95-97, R1100R 94-00, R1100GS 94-06, R1100RT 94-01
- BMW CLUTCH CABLE R1100RS '92-'01
-
Gaskets
>
- F650 F650ST CLUTCH COVER GASKET
- F650 FUNDURO AND F650ST VALVE COVER GASKET
- F650,700,800 VALVE COVER GASKET SET
- BMW F650,F700,F800 CLUTCH COVER GASKET
- BMW F650GS, F650CS, G650GS & G650X VALVE CVR GASKET
- CLUTCH COVER GASKET, BMW F650 (Single Cyl) & G650
- BMW R-Series AIRHEAD VALVE COVER GASKET SET
- BMW R1200/R900 HEXHEAD VALVE COVER GASKET
- BMW OILHEAD VALVE COVER GASKET R850 R1100 R1150 R1200C
- BMW K75 MODELS VALVE COVER GASKET SET
- K1, K100, K1100 VALVE COVER GASKET
- K100 (8 valve) VALVE COVER GASKET SET
- SPARK PLUGS >
-
BMW CLUTCH CABLES
>
- Misc
- Blog
- Tech
- Contact Us
- Shipping and Returns
- About Us
 RSS Feed