|
So, some time has gone by since my last blog and it’s time to get caught up. But first, I would like to thank all of the people who have contacted me in regards to the blogs I have posted. The number of questions and emails I have received has been terrific. I guess people prefer to contact directly, rather then leave comments. I will share the most common questions and answer them here, within these blogs. As many of you know, my business is manufacturing tools and parts, primarily for BMW Motorcycles, but also other European models as well. What this means in regards to the current restoration is that we are creating products specifically for the Airheads. This does tend to slow a restoration some, but not completely. Right now, we are finishing production on our new ignition wires, complete with original German Beru caps! We are also completing a new exhaust nut wrench that will work on both the early and late style finned nuts. And finally, brand new reproductions of the venerable BMW seat hinges. In addition to the products we are manufacturing, we are now a dealer for Venhill control cables. They make high quality replacement cables for BMW motorcycles and we are proud to be offering their products to our customers. We will begin listing all of these products on our website in the coming weeks. As previously stated, this can slow a restoration some, but the benefit is high quality aftermarket tools and components. We will keep you posted on these as well as additional products as they become available. But now, let’s answer some of the questions I received. First, will the R75/5 be a stock restoration or a café build? Stock….I love café style bikes and the latitude they offer in terms of creativity, but this is not the bike to use as a donor. Simply put, it would be a shame to do this to such a beautiful, numbers matching bike that is becoming increasingly rare. I prefer a café build to be done to bikes that are incomplete, mass produced, non matching numbers and don’t have significant historical value (in most cases). Again, this R75/5 is a matching numbers bike with a clean title so I am choosing to do a stock restoration. Now, for sake of argument, if this was only a partial bike with non-matching numbers and parts, I could see how an R75/5 could make for an awesome café build! As for my thoughts on café bikes, well, a café bike MUST be fast and functional, yet be sculpted like a piece of art, at least to me. What I want in a café style bike is for the binders to stop you in an instant, a frame and suspension you can dive into corners with, and a drive train that pulls like a raped ape! Simply bolting on a bunch of crap and using terms like steam punk or old school to legitimize it, doesn’t do it for me. However café style bikes is about personal expression. What might not float my boat may be exactly what someone else loves! Either way, I appreciate the work that goes into it even if it is not my own taste. As a huge fan of racing (especially Moto GP), I am more then willing to step out on a limb and try new things. Changing things like crank phasing, cams, firing orders, welding up port runners and changing their shapes and valve angles to make power at different variables is just part of what it takes to push the boundaries on what is possible. Machining my own parts gives me endless possibilities governed only by my imagination. It can be a heck of a lot fun and very rewarding, but also extremely disappointing when your motor grenades at 12000 rpm! There is a fine balance to be had and finding the limits can be extremely expensive. The old adage of, “speed costs” is a very real statement. Another common question is will I be taking the entire engine apart or just the top end. The answer is, the whole engine. Although I ran several tests at the beginning (see previous blogs) and don’t expect any problems, it is best to open her up and blue print the lower end to confirm a complete and proper build. With the engine already out and top end off, there is only a handful more bolts to complete disassembly. If I had owned this bike for any length of time and new its history intimately, then perhaps I would not need to go this far. But like 99% of my restorations, I was not the one in the saddle racking up the miles. Consequently, she will come apart. The 3rd question is, will I be taking apart the transmission? Yes, I will disassemble the transmission. Again, for the same reasons listed above, it would be a shame to not do it while it is on the bench and accessible. I would hate for Murphys law to step in after completion and discover a problem which could have been avoided by being thorough. As a final thought, there is always someone who knows more. Being good at something often times means knowing where to find answers to questions that arise. The internet is a great source, but should be taken with a grain of salt. There seems to be a fair share of arm chair quarter backs that basically reiterate old posts or information they heard without having first hand knowledge. Sift through all that, and there really are some very knowledgeable people out there more then willing to help where they can. Tapping there knowledge base can be invaluable. Don’t be afraid to ask questions. It can really save you time in the long run. I usually have a core group of people that I do this with, each with there own strengths. One individual is quite a historian of Italian bikes while another with old British iron and so on and so on. Knowing who to ask is the key. Again, asking questions is great. However, I still adhere to the man code and generally won’t ask for directions to a location though….lol… That’s all for now, but I will update the blogs with photos and progress of the R75/5 very soon. In the meantime, I hope everyone enjoyed the holidays and spent time with your loved ones. As for me, I look forward to a fun filled new year!!!
1 Comment
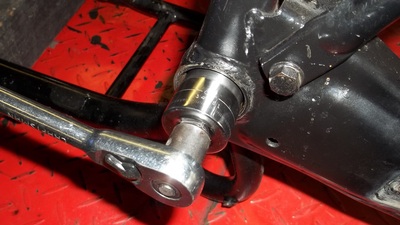
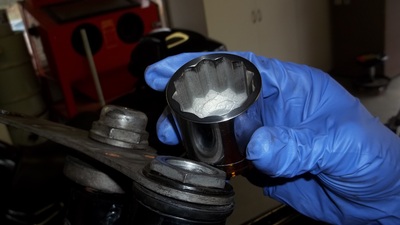
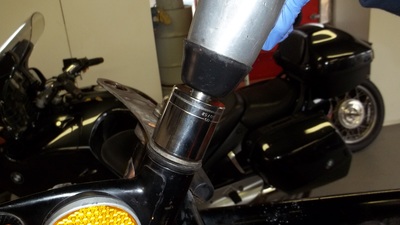
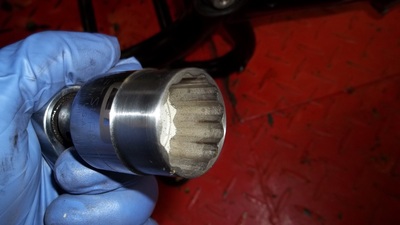
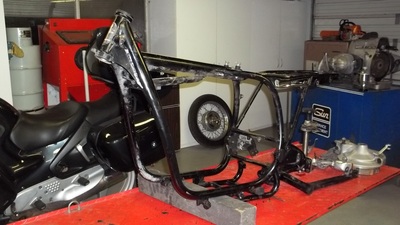
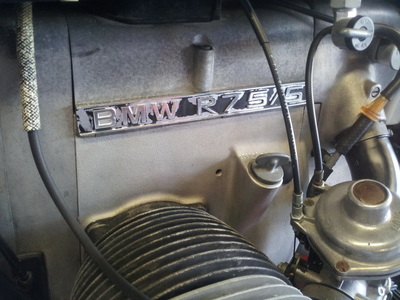
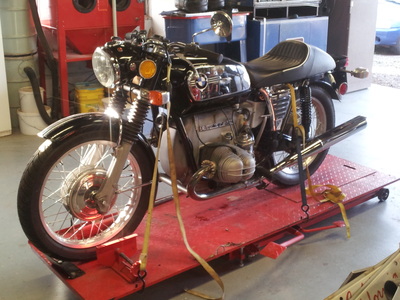
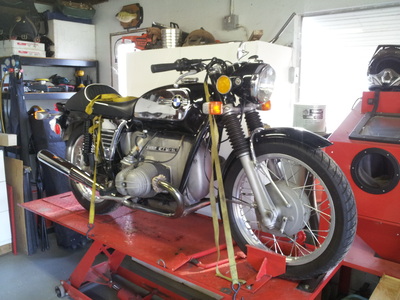
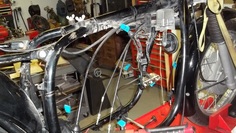 Ok, so in the last blog, I had done an initial assessment of the R75/5 and removed several components and eventually the motor and transmission (see the previous blog: And so it begins). Now we continue to forge ahead and have much to tell. The most difficult and tedious aspect of a restoration, at least for me, is inventorying all the individual parts and documenting them as it comes apart. The most crucial of these being the wiring harness. Once again, I enlist my wife to give me a hand with this. She is very detail oriented and quite handy with a wrench. Besides, she has a way of livening up the shop as well! We began by taking several photos of the wiring harness and labeling each wire according to what component each goes to. Even when replacing the harness with a new one, it makes it a lot easier to lay the two side by side and have a quick reference to work with. The photos help aid in their routing and orientation on the frame. Now, you might be thinking that I could just follow the wiring diagram, and you would be right, but it is much more time consuming. First order of business is to disconnect numerous connections, ie; oil pressure sending unit, neutral safety, coils, alternator, starter, starter relay, diode board, voltage regulator, blinkers, brake lights, brake switches (front and rear), etc, etc….I chose to leave the wiring connected inside the headlamp bucket (for now), then pulled the wiring harness out of the frame. Again, a second set of hands here really helps! Now the wiring on this model is very straight forward, unlike newer models that have traction control, antilock brakes, engine management systems, etc…Those type of systems are not as forgiving and the slightest resistance can cause faults, especially computer grounds. These old systems however are very straightforward and a little time marking locations pays dividends in the long run. With the wiring completely removed, I turned my attention to the mechanical side of dismantling. Now for this, it again really helps to have assistance. My buddy Jarrett came by the shop and I immediately put him to work (thanks Jarrett). We removed the rear blinkers and tail light assembly, followed by the fender, shocks and rear wheel. As stated in my previous blogs, the components are taken apart as units, to be dismantled and rebuilt in future installments. With all the parts removed from the swing arm, I was able to feel the condition of the swing arm bearings. There was no play and they did not feel notchy, but we’ll obviously look closer at them on rebuild. Removal of the swing arm was straight forward, using my special 27mm socket that had its wall machined down. (available on my website) The hex nut, which locks the pivot pin in place, is in a recess of the frame on these old airheads. This prevents using a standard socket. Turning my attention to the front end, I removed the front wheel and fender, then turned the triple clamps left and right and felt the condition of those bearings. They felt stiff and notchy, indicating bearing wear. To remove the top nuts on the forks, I again used my special 36mm socket (available on my website) to keep from stripping them. If you have ever removed these before then you know how thin these nuts are. Stripping them is very easy without having a socket whose face has not been machined to better register / purchase on the nuts. Additionally, this is one of the few times I will actually use an air tool on a motorcycle! This facilitated the removal of the front shocks, but not without a fight. After releasing the pinch bolts in the triple clamps, Jarrett and I had to twist and turn the forks to free them from there saddles, while my wife held the frame steady. But, patience paid off and out they came. Lastly, we removed the steering stem nut and steering stem, exposing the bearings. The bearing race was scalloped and the bearings had signs of rust. They undoubtedly will be replaced with a fresh set after paint. The accompanying photos show its current state. All that is left to disassemble is the seat lock assembly and the rear sub-frame, which is held together by just 4 bolts. In the next blog, we’ll start getting into some more technical aspects of the build with related photos. I need to do some TIG welding on the frame and also bore and bush the center stand pivots, as well as the side stand pivot. There is no shortage of things to do and I will document them as we go. For me, the next couple of months are the best, in terms of the restoration. What I mean is that instead of disassembly, I get to renew, rebuild and restore. It is a form of therapy for me. Making something better then when I received it is a great reward. So check back and follow along as we continue to rebuild the R75/5 and give her a new lease on life! Special tools used: 27mm Swing arm Socket 36mm Fork Cap Socket (both available at http://www.ocdmachine.com/tools.html ) 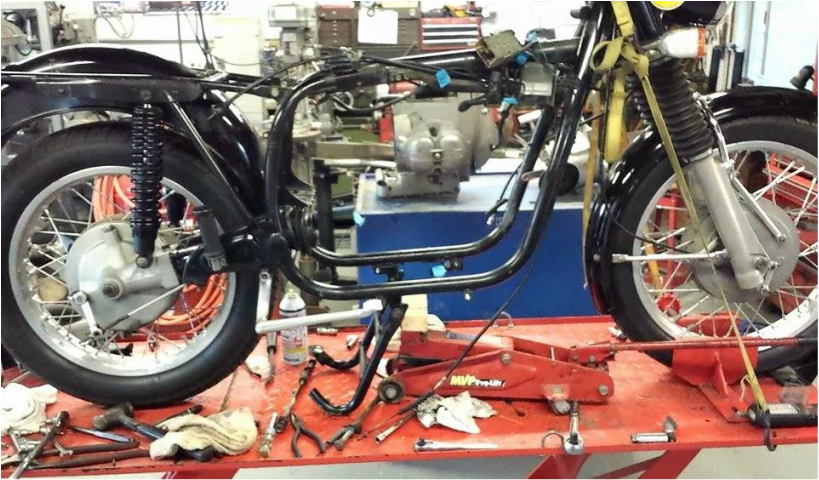 I started by taking a good long look at the R75/5. Yes, to the point of staring at it up on the lift for untold amounts of time. Kind of the way Robert Duvall talked to and spent time with his stock car in the movie Days of Thunder. I always start any restoration this way, making mental and physical notes of what is going to be needed and putting together a game plan. The idea is to gain as much information about the bike and its overall condition before I disassemble it. Ok, so let’s get started. I first fired her up and took her out for a quick ride, bringing her up to full operating temperature, then up to cruising speed. The ride began ok, but I quickly discovered a couple of things in need of attention. On the ride, I started with the petcocks on reserve, due to a fairly low tank. The bike began to sputter at speed, so I reached down and flipped the petcocks to the on position, temporarily solving the problem. I will have to rebuild those and clear the blockage. Continuing the ride, the bike wasn’t as lively as it should be. It definitely needs a good tune up, but also a lot of well deserved attention in several areas including the carburetors. Speaking of carburetors, the diaphragms are a likely suspect, as those have been known to cause these very kinds of symptoms. Moving on, I was able to shift through all the gears under heavy throttle, with none popping out. Shifting was of course clunky, but this one was more so then usual. The clutch is ill adjusted at best. It was very grabby even when let out slowly. Many things can cause this from a contaminated friction plate, warped clutch components from excessive heat or a crankshaft with excessive end play. Lights, horn, brake lamp, etc…all work, but the ignition switch is dodgy. If you touch the key while running, the motor and lights will cut out. Once back in the shop, I put the R75/5 back on the lift. I checked the charging system output and starter draw as well as drop voltage on suspect circuits. I like to use my Snap-On/Sun scope for this. It gives me the ability to see the wave form of the components I am testing, which really allows me to see the health of them. Kind of like when the doctor runs an E.K.G. on your heart. He can listen to it with a stethoscope, but it does not reveal enough information. Conclusion, I will have to rebuild the starter, as it had several repetitive electrical drop outs while cranking. I then checked compression (155 / 142) followed by a leak down test and discovered a leaking intake valve in the offending cylinder. Finally, I finished with a test of the oil pressure, as this is a great way to help gage the internal health of your motors bearings. During my visual assessment, I discovered a broken/missing frame tab that is used as a fender mount. Additionally, the center stand has a broken/missing metal rod that is used to push it down with your foot. Seat hinge pins are AWOL, as is the battery hold down. So I will be doing some TIG welding after I strip her down. Other items include rubber parts, boots, finned exhaust nuts, etc….This list will undoubtedly grow with time as we delve deeper into this project. To begin disassembly, we will do so modularly. What I mean is, I like to take things apart in groups. I then rebuild those parts/groups before proceeding to the next group. For instance, there is no need to disassemble the wheels, cutting the spokes, etc…until I am ready to rebuild, refinish, install bearings and lace them. It is a system that works well for me and keeps the shop tidy to boot. It also makes organizing, inventory and parts orders relatively easy. Now that we’re ready to turn wrenches, it’s time to enlist the help of my wife and son. We begin by removing the seat, tank, carburetors, battery, exhaust, necessary electrical, fluids and finally the motor and transmission. I did not want to take the cylinders and heads off during removal, because the engine will sit while I work on the chassis and make it a roller again. As a result, it was easier to take the transmission out followed by the motor. Both independently left in tack, until I am ready to machine components and conduct the rebuild. Well, that’s it for now. Next installment we’ll continue disassembly of the chassis and see about tig welding the frame. Lot’s of fun and pictures to come, so check back as the project continues and we revive this old bike as well as build some good memories! I did it! I have finally found the right motorcycle restoration candidate, the BMW R 75/5. I have been looking for a long time now to find the right project, but my expectations have kept me from buying the first several I had found. The R 75/5 has significant historical value, but I won’t go into a long history lesson here, as that information is readily available through a few key strokes on your computer. Rather I will just highlight a couple features that make it important to me. In the late 60’s and early 70’s, motorcycles from the British markets were fast, fun, well handling machines (for their time). Norton and Triumph were alive and well. However, they were not alone. The Japanese were now putting out larger capacity machines that were also fast and fun, but also very reliable and much more affordable. BMW motorcycles were still using the old frames and technology from their early bikes and were in need of a facelift if they were going to be a competitor in this new, evolving market. Facing all these handicaps while under constant pressure from the BMW Corporations automotive side (A division which was quite successful by this time and dwarfing motorcycle production). The answer was the /5 series of motorcycles. The R 75 being the largest capacity of the series. The newly designed frame closely resembled the great handling Norton featherbed frame, but had its own technologies, such as conical shaped tubing of varying sizes to handle the different stress points of the bike. Additional features were improved telescopic forks, push button electric start (as well as kick start) and a new 12 volt battery system with an alternator. Additional features such as a relocating the camshaft to below the crankshaft, allowed for the push rod tubes to be mounted below the cylinders. This new configuration actually gave more ground clearance when turning and a cooler method for oil to make its way back to the sump. A forged, one-piece crankshaft with automotive style plain bearings and light weight aluminum castings made for a great overall package. Again, there are numerous writings that go into great depths, both in terms of historical and technical evolutions. If you’re seriously interested in such readings, then I highly recommend the wonderful, historically correct writings of Ian Fallon. His writing style is clear, concise, and very technical. The R 75/5 on a personal note means something special to me. It takes me back to a time when motorcycling was simple and unabated by technology. When knowing the basic workings of a motorcycle was a necessity rather then a luxury. If you were to take a road trip, it was a good idea to have a set of tools and know how to use them. Setting points was just part of owning a bike and meant the difference between keeping your road trip going or cutting it short. A time when BMW provided a comprehensive tool kit under your seat that would allow you to turn just about every nut and bolt on your bike, all while on the side of the road or in a parking lot. A simpler time before fuel injection, traction control, anti-lock brakes, etc…A time when you felt as though you were part of the machine, not just riding on it. A time when I was a much younger man and enjoyed the wind in my face and could physically go hundreds of miles at a time, only limited by fuel tank capacity. Back when responsibility was a relative term and I only had to answer for myself and not an entire family. A time before mortgages, property taxes and other constraints. The R 75/5 fits the bill. It’s a classic bike with great manners and legendary reliability. All this while still preserving a simpler time that might otherwise be forgotten if not for these fine machines from our past. Wow, where to begin! This is going to be my first blog. OCD Machine has been doing very well and I have been inundated with numerous tech questions, referrals, etc…. I have wanted to start a blog regarding tech, features, etc, but somehow have fallen short of actually doing so…until now.
So with my first attempt, we’re going to start it off with my experience at the legendary 2014 Sema / Aapex Show. Almost all gear heads have heard of Sema, but few have attended. It is a special automotive show featuring the latest trends, builds, builders and products to hit the automotive market. It literally has the same mystic of Hollywood. All the top names and personalities in the business gathered for just a few days to show off their work and pimp their products. To enter the show, requires you to be in the business, so to speak. And yes, they actually check. I had to send in my business license, Tax Id Permit, business cards, etc…After the background was complete, I received my badges in the mail and shortly after my wife and I were bound for Las Vegas! So now that I have hopefully perked your interest, let’s switch gears to what I was really there for, the Aapex show. Aapex is the automotive after market parts expo. This show is HUGE! It runs concurrent with the Sema show, and last’s 3 days. Manufacturers from all over the world attend and have booths with there products and many perform demonstrations. It is an outstanding opportunity to meet perspective vendors, customers and future business partners face to face. You have the opportunity to handle and tryout various products for yourself and get a feel for the market and its trends. Aapex 2014 was held at the Sands Expo Convention Center in Las Vegas which is a site to see in and of it self. It literally is 2.25 million square feet with multiple levels. The show had over 2,300 vendors and thousands of products. Attendance for this event has been estimated at over 130,000 business professionals. With so many booths to visit, it was impossible to see even 10% of what was there. Finding particular booths was difficult, at best. Before we left, we had downloaded the Aapex apps to our phones in an effort to navigate our way through the show. I had numerous vendors from over seas that I had spoken with multiple times over the phone, but hadn’t had the privilege to meet in person until now. My wife Lyn (who incidentally runs our website and handles the books) attended seminars related to our business while I shopped for new products. The biggest issues with being a small business came in the way of what’s known as MOQ, or, Minimum Order Quantity. Each manufacturer has their own MOQ and they can very greatly from say 100 items to a 40 foot shipping container or more! Buyers from all the major parts chains were busy buying millions of dollars of inventory at a time, while I was only able to buy small quantities. As I explained to so many manufacturers, I am in a niche market. With me wanting to purchase such small quantities (by the automotive trade standards), most manufactures would rather you go through a distributor. This however raises the prices dramatically as the items pass through several hands, each getting his slice of the pie. By the time items reach the customers, it literally has inflated to extortionate levels. This is simply NOT okay. After having met with several wonderful manufacturers who are willing to work with us, you are going to see some new products coming over the next few months. Products directly from the manufactures to save you money. What products you ask? Well, stay tuned, it’s a surprise! |
AuthorJames Widenmann Archives
January 2015
Categories |
- WELCOME
-
Tools
-
Parts
-
BMW CLUTCH CABLES
>
- BMW CLUTCH CABLE /5/6/7 STANDARD BARS R90/R100 S/RS
- BMW CLUTCH CABLE /5/6/7 MODELS WITH HIGH BARS R80 / R100 RT/GS
- BMW CLUTCH CABLE K75, K75 C/S, K100, K100RS,
- BMW CLUTCH CABLE 1984-ON K75 C/T/RT/LT, K100 RT/LT, K1100RT/LT
- BMW CLUTCH CABLE R850R/RT 95-97, R1100R 94-00, R1100GS 94-06, R1100RT 94-01
- BMW CLUTCH CABLE R1100RS '92-'01
-
Gaskets
>
- F650 F650ST CLUTCH COVER GASKET
- F650 FUNDURO AND F650ST VALVE COVER GASKET
- F650,700,800 VALVE COVER GASKET SET
- BMW F650,F700,F800 CLUTCH COVER GASKET
- BMW F650GS, F650CS, G650GS & G650X VALVE CVR GASKET
- CLUTCH COVER GASKET, BMW F650 (Single Cyl) & G650
- BMW R-Series AIRHEAD VALVE COVER GASKET SET
- BMW R1200/R900 HEXHEAD VALVE COVER GASKET
- BMW OILHEAD VALVE COVER GASKET R850 R1100 R1150 R1200C
- BMW K75 MODELS VALVE COVER GASKET SET
- K1, K100, K1100 VALVE COVER GASKET
- K100 (8 valve) VALVE COVER GASKET SET
- SPARK PLUGS >
-
BMW CLUTCH CABLES
>
- Misc
- Blog
- Tech
- Contact Us
- Shipping and Returns
- About Us

 RSS Feed